My Travel Workflow
- Jun 6, 2016
- 5 min read
I don't mess around when it comes to backups and redundancy. As I am writing this, I literally JUST had my computer stolen from me while I was traveling through Namibia. Luckily the laptop was encrypted, so the most they could do would be to reformat it or swap the drive... or so I am hoping. The whole encounter left me reeling and has since inspired me to take my backup game to the next level. Sometime in the fall/winter, in addition to the workflow I am about to share, I plan on looking into getting a NAS and even using a cloud service to back up my work.
Workflows differ among photographers, and my best advice is basically to stick with what you know, and what's easiest for you. For me, I learned in Photoshop so my workflow is centered around Adobe Camera Raw instead of something like Lightroom. We'll get into this in a second.
What you need for a good workflow:
A computer - I travel with an 11" Macbook Air and when I am home, I use an older 27" iMac circa 2010. Both of these machines are fine for editing, but the larger screen at home makes things a little bit faster. The 11" Macbook fits into some pretty tight spots, and is perfect for the tray table on airplanes. I love it.
Hard drives - I have a thing for hard drives. I travel with 2x SSD drives and right now they happen to both be 512GB Samsung's 850 Pro drives mounted in generic enclosures. I'd recommend them, or another form of SSD for travel.

Pro tip - Note that one of the enclosures has a good 8-10 feet gaffer's tape wrapped around it, and the other one has Kapton Tape (a requirement for some of my work travel). Which reminds me, it's looking in need of replacement...
[Alternative solution] - Dropbox and Google Drive are always a great alternative to backing up, but their low space allowance means you'll be paying to dump your files off that 32GB card... both in money, and upload times!
A good card reader - Yes, you can always use a USB cable to read directly from your camera, but there's obvious advantages to NOT having to resort to that like increased transfer speed and the ability to swap cards and continue shooting while downloading photos. I have two card readers, one Kingston USB 3.0 Media Reader and a Firewire 800 CF reader for when I am home. Again, whatever works best for your setup will be fine.

Fast/large memory cards - There's two schools of thought; one that claims multiple smaller cards are better because the decreased risk of losing all your pictures, and the other that asserts the belief of keeping everything in one spot is better. My camera has two slots and I set the camera to save the RAW images on both cards, using 64GB in both spots.
My workflow for an average day of traveling:
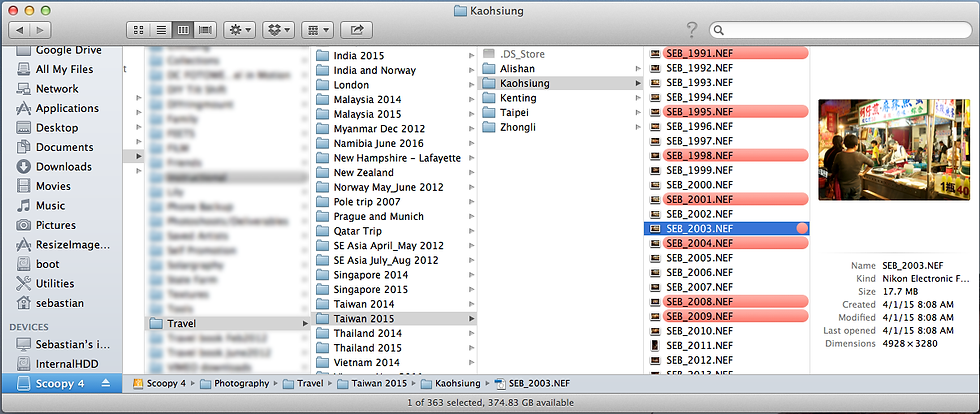
1.) At the end of each day of travel I will download the RAW images from the camera onto my laptop into an appropriately named folder of the location or any other important detail.
2.) As I go through the images, I will apply a red label to the images I want to edit and a gray label to any image that's part of a panorama. Anything that I want to revisit for another reason (possibly an abstract out of focus image, or something I want to print as a gift) I will apply a blue label. I've assigned a keystroke shortcut in OSX to apply my labels.
3.) When I'm satisfied I've labeled all the images I want to edit, I will then drag-and-drop these into BOTH of my drives, making a mirrored clone of the directory. Sure, you can use software to do this... but it's just as simple to do it manually.
4.) As I mentioned, I use Photoshop to edit all of my work. Opening a RAW file with Photoshop involves using the Adobe Camera Raw (ACR) tool - basically a less polished Lightroom-esque tool. Sometimes I will have multiple files with similar lighting/exposure, so I can edit one of the photos and apply the edits to the whole stack. Note the ability to selectively choose which parameters you'd like to sync up.

5.) The act of opening a RAW file with ACR creates an 8kB .xmp file in the same folder. To do this, either click Done or click Open Images to create the .xmp "sidecar file". From now on, so long as this .xmp file is in the same directory when you open this RAW image again, the exact same edits will be applied to the image in ACR. You can hand off this file to whomever you please, and when they open it they will see your edits. If you open one of these files, you can see the array of edits and parameters that make up your image, including camera/lens stats.

Example of .XMP contents including exposure settings, serial number, copyright/comment information, and even shutter actuations:
xmp:CreatorTool="NIKON D4 Ver.1.03 " xmp:CreateDate="2015-04-01T08:08:32.90" xmp:MetadataDate="2015-04-17T01:57:17-04:00" exif:ExposureTime="1/500" exif:ShutterSpeedValue="8965784/1000000" exif:FNumber="17/10" exif:ApertureValue="1531069/1000000" exif:ExposureProgram="1" exif:SensitivityType="2" exif:ExposureBiasValue="0/6" exif:MaxApertureValue="10/10" exif:SubjectDistance="211/100" exif:MeteringMode="3" exif:LightSource="10" exif:FocalLength="350/10"
6.) Once I am happy with the images after done in ACR, I have two choices:
I can use the ACR dialog box to Save images... with a desired prefix (for example, SEB_2001.NEF would turn into edit_SEB_2001.jpg) and let Photoshop chug through all the batch saving commands...

If there's anything I need to do within photoshop, I can click Open Images
and finish up the edits from within Photoshop's main program. This means that I'll have a lot of files to save after the edits, so I use a batch command to save all open files with the edit_ naming scheme.
7.) Either method I employ, I have a bunch of edited .jpg files in the same directory. At this point, I will go through one more time and compare the actual edited images looking for duplicates or undesired traits. Again I will use the keyboard shortcut and assign red labels to the keepers, and this time I will assign gray labels to any photos I'd like to make into diptych or triptych sets.
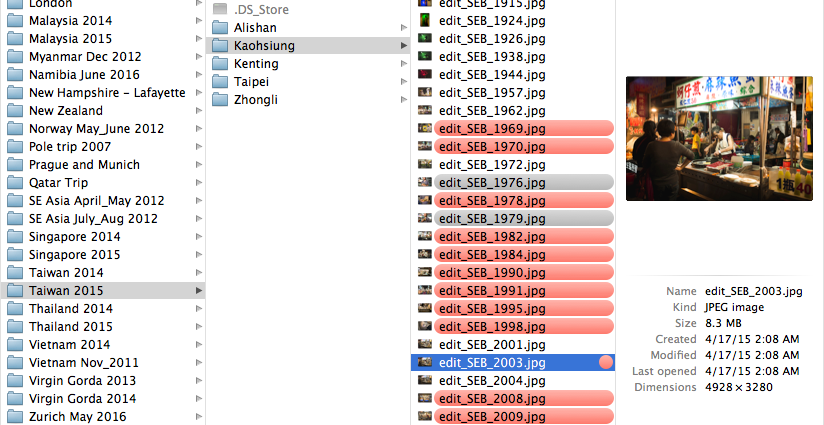
8.) Finally, if I am still awake, I will then grab all of the .xmp and .jpg files from these endeavors, and drag-and-drop them onto the backup SSD drives. Sometimes it's useful to sort the Finder directories by date modified if finding the .xmp files becomes troublesome.
Redundancy:
My RAW files are on five separate drives (two memory cards, two SSDs and my laptop) and my edits and .xmp files are on three separate drives (two SSDs and my laptop). This sounds silly, but I try and always separate the two SSDs when possible - bringing one with me for the day, and leaving one with my bags back at the accommodation.
My backup schedule for when I return home will be covered in a separate blog post. Stay tuned, stay redundant. Stay tuned, stay redundant.


![[GEAR] - Alaska packing loadout](https://static.wixstatic.com/media/cd981d_3e6db13b8025420486afd5d3f5371fbb~mv2.jpg/v1/fill/w_1200,h_789,fp_0.50_0.50,q_30,blur_30,enc_avif,quality_auto/cd981d_3e6db13b8025420486afd5d3f5371fbb~mv2.jpg)
![[GEAR] - Alaska packing loadout](https://static.wixstatic.com/media/cd981d_3e6db13b8025420486afd5d3f5371fbb~mv2.jpg/v1/fill/w_152,h_100,fp_0.50_0.50,q_90,enc_avif,quality_auto/cd981d_3e6db13b8025420486afd5d3f5371fbb~mv2.jpg)


![[SCOUTING] - 5 free tools for location scouting](https://static.wixstatic.com/media/cd981d_de249e29df1345719b055107fb432fe0~mv2.png/v1/fill/w_1256,h_694,fp_0.50_0.50,q_35,blur_30,enc_avif,quality_auto/cd981d_de249e29df1345719b055107fb432fe0~mv2.png)
![[SCOUTING] - 5 free tools for location scouting](https://static.wixstatic.com/media/cd981d_de249e29df1345719b055107fb432fe0~mv2.png/v1/fill/w_152,h_84,fp_0.50_0.50,q_95,enc_avif,quality_auto/cd981d_de249e29df1345719b055107fb432fe0~mv2.png)
Comments